Is your tonneau cover’s rubber seal giving you trouble? Don’t worry, we’ve got you covered!
Discover how to fix the rubber seal on a tonneau cover to restore its functionality in no time.
No matter if it is a loose seal or a damaged one, our step-by-step guide will walk you through the process, so you get a secure and watertight seal.

How do you fix the rubber seal on a tonneau cover?
To fix a rubber seal, you’ll need a few common tools and materials:
- Adhesive or sealant
- A soft brush or cloth for cleaning
- Small brush or finger for applying sealant
- Replacement seal if the damage is extensive.
Step 1: Clean the Rubber Seal
Start by cleaning the rubber seal on your tonneau cover. Use a mild detergent and water solution, along with a soft brush or cloth, to remove any dirt, grime, or debris.
Ensure that the seal is completely dry before proceeding to the next step.
Step 2: Inspect for Damage
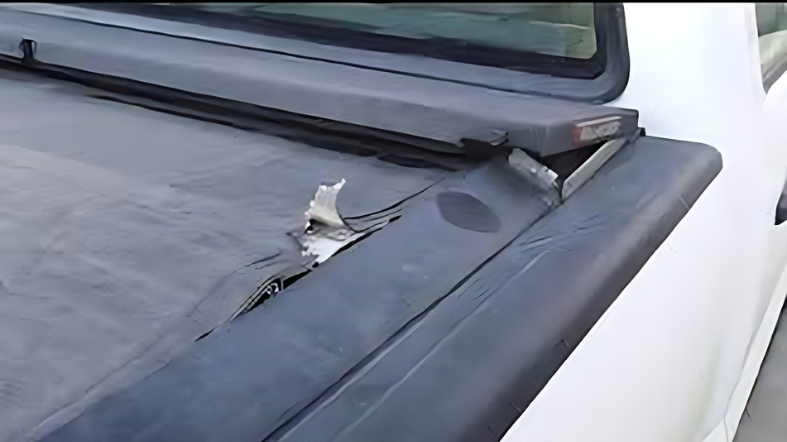
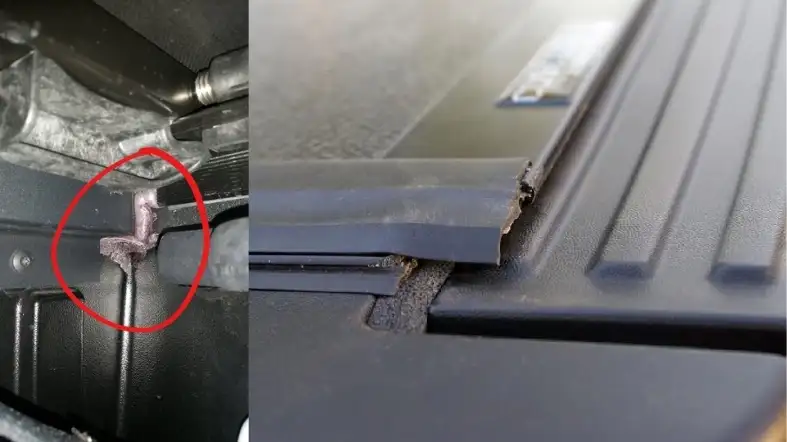
Carefully inspect the rubber seal for any signs of damage or wear. Look for cracks, tears, or areas where the seal has become loose or detached.
Identify the extent of the damage to determine the best course of action.
Step 3: Repair Small Tears or Cracks
For small tears or cracks in the rubber seal, you can use a sealant designed for automotive purposes.
Apply the sealant to the affected area, following the manufacturer’s instructions.
Use a small brush or your finger to spread the sealant evenly and ensure proper adhesion.
Step 4: Replace a Damaged or Detached Seal
If the rubber seal is damaged or completely detached, it may need to be replaced.
Contact the manufacturer or a reputable supplier to obtain a compatible replacement seal for your tonneau cover.
Follow the installation instructions provided with the new seal, ensuring a secure fit.
Step 5: Apply Adhesive for Loose Seals
If the rubber seal is intact but has become loose, you can use adhesive to reattach it. Choose an adhesive suitable for rubber and automotive applications.
Apply a thin, even layer of adhesive to both the tonneau cover and the rubber seal. Press the seal firmly in place and hold it for the recommended drying time.
Step 6: Test for Proper Seal
Once the repair or replacement is complete, it’s crucial to test the tonneau cover for a proper seal.
Close the cover securely and run your hand along the edges, feeling for any gaps or inconsistencies.
If necessary, make additional adjustments or reapply the adhesive to ensure a watertight seal.
What is the Importance of a Properly Sealed Tonneau Cover?

By recognizing these signs of a damaged or loose rubber seal on your tonneau cover, you can take proactive measures to address the issue.
Step 1: Shielding Your Truck Bed
A sealed tonneau cover serves as a shield, safeguarding your truck bed from external elements such as rain, snow, dust, and UV rays.
By creating a tight seal, it prevents water, debris, and harmful UV rays from entering, thereby minimizing the risk of damage to your truck bed.
Step 2: Preventing Water Damage
When your tonneau cover has a secure seal, it prevents water from seeping into your truck bed.
This is especially crucial during rainy or snowy weather. By keeping moisture at bay, you can avoid water damage, corrosion, and rust that can compromise the integrity of your truck bed.
Step 3: Preserving Cargo Integrity
A properly sealed tonneau cover provides an additional layer of protection for the items you transport in your truck bed.
It prevents moisture, dust, and debris from infiltrating and damaging your cargo.
Step 4: Enhancing Security
By sealing your tonneau cover effectively, you enhance the security of your truck bed and its contents.
A tightly sealed cover makes it more difficult for potential thieves to access and steal your belongings.
It acts as a deterrent, providing an extra layer of security for your valuable items.
Step 5: Improving Fuel Efficiency
Believe it or not, a properly sealed tonneau cover can contribute to improved fuel efficiency.
By reducing air drag and improving aerodynamics, it helps your vehicle cut through the air more smoothly.
This, in turn, reduces fuel consumption, saving you money and benefiting the environment.
Step 6: Preserving Aesthetic Appeal
A tonneau cover with a secure seal not only protects your truck bed but also enhances the overall appearance of your vehicle.
It provides a sleek and streamlined look, giving your truck a polished and professional appearance.
A well-maintained tonneau cover adds to the visual appeal and value of your vehicle.
Signs of a Damaged or Loose Rubber Seal on a Tonneau Cover

The signs of a damaged or loose rubber seal on a tonneau cover are:
Step 1: Water Leakage
If you notice water seeping into your truck bed, it could be a sign of a damaged or loose rubber seal on your tonneau cover.
Check for water stains or pooling inside the truck bed after rain or when washing the vehicle. This indicates a compromised seal that requires attention.
Step 2: Dust and Debris Accumulation
A loose or damaged rubber seal allows dust, dirt, and debris to enter the truck bed.
If you frequently find a buildup of particles on your cargo or truck bed surface, it’s a clear indication of an ineffective seal.
Regularly inspect for the presence of unwanted debris as a sign of a compromised seal.
Step 3: Whistling or Air Noise
When driving at higher speeds, listen for any whistling or unusual air noise coming from the tonneau cover area.
A loose or damaged seal can create gaps that allow air to pass through, causing noise disturbances.
Pay attention to these audible cues as they signify a seal-related issue.
Step 4: Difficulty in Opening or Closing
A rubber seal in good condition should provide smooth operation when opening or closing the tonneau cover.
If you experience resistance or difficulty in these movements, it may indicate a loose or damaged seal.
Pay attention to any changes in the ease of use and address the issue promptly.
Step 5: Visible Seal Damage
Inspect the rubber seal closely for visible signs of damage. Look for cracks, tears, or areas where the seal has become detached or worn out.
Even small damages can compromise the effectiveness of the seal. Carefully examine the entire length of the seal to identify any visible issues.
Step 6: Increased Road Noise
A properly sealed tonneau cover helps minimize road noise. If you notice a sudden increase in road noise while driving, it could be due to a loose or damaged rubber seal.
Pay attention to any changes in noise levels and investigate if the seal requires repair or replacement.
Preventive Measures: Maintaining the Rubber Seal on a Tonneau Cover
By following these preventive measures, you can maintain the rubber seal on your tonneau cover.
Inspecting the Rubber Seal
To begin with, examine the rubber seal on your tonneau cover. Look for any signs of wear, cracks, or tears.
Run your fingers along the seal to feel for any irregularities. If you notice any damage or deterioration, it is crucial to address it promptly to prevent further issues.
Paying attention to these details can help to catch problems early on and take appropriate measures to maintain the rubber seal.
Cleaning the Rubber Seal
Regular cleaning is essential to keep the rubber seal on your tonneau cover in optimal condition.
Start by preparing a mild soap solution using warm water. Dip a soft cloth or sponge into the soapy mixture and scrub the rubber seal.
Be thorough and ensure you reach all areas, including the corners and edges.
This process removes dirt, debris, and other contaminants that could compromise the seal’s effectiveness.
Drying the Rubber Seal
After cleaning the rubber seal, it is crucial to dry it. Take a clean, lint-free cloth and carefully wipe the seal until it is dry.
This step is important because moisture left on the rubber can lead to mold or mildew growth, which can weaken the seal and cause damage over time.
By ensuring the seal is completely dry, you maintain its integrity and extend its lifespan.
Applying a Rubber Protectant
To further safeguard the rubber seal, consider applying a rubber protectant. There are various products available, designed for rubber surfaces.
Choose a high-quality rubber protectant and follow the instructions provided by the manufacturer.
Typically, you’ll apply the protectant to a clean, dry cloth and then evenly distribute it over the entire rubber seal.
This protective layer helps prevent drying, cracking, and fading caused by exposure to sunlight and other environmental elements.
Avoiding Harmful Chemicals
While maintaining the rubber seal on your tonneau cover, it’s crucial to be mindful of the chemicals you use.
Harsh chemicals, such as bleach, solvents, or petroleum-based cleaners, can deteriorate the rubber and compromise its effectiveness.
Stick to mild soaps or cleaners specifically designed for rubber surfaces to ensure you don’t inadvertently damage the seal.
By using the right cleaning products, you protect the rubber seal and maintain its functionality.
Regular Inspection and Maintenance
Lastly, make it a habit to regularly inspect and maintain the rubber seal on your tonneau cover.
Perform visual inspections to check for any signs of damage or wear. Keep an eye out for changes in the seal’s appearance, such as discoloration or brittleness.
Additionally, clean the seal periodically and reapply the rubber protectant as needed.
By staying proactive and consistent in your maintenance efforts, you ensure the longevity and effectiveness of the rubber seal on your tonneau cover.
Comparison: DIY Repair vs. Professional Assistance for Tonneau Cover Seals

When it comes to repairing tonneau cover seals, you have two options: tackling the task yourself or seeking professional assistance.
While both choices have their merits, it’s crucial to weigh the pros and cons before making a decision.
Here we’ll compare DIY repair and professional assistance for tonneau cover seals, exploring the steps involved, potential challenges, and the overall effectiveness of each approach.
DIY Repair
If you’re up for a challenge and enjoy hands-on projects, tackling the repair of your tonneau cover seals yourself can be a satisfying endeavor.
Here’s a step-by-step breakdown of the DIY repair process:
Assessment
Begin by thoroughly inspecting the tonneau cover seals to identify the extent of the damage. Look for cracks, tears, or areas where the seal has deteriorated.
Research
Once you’ve assessed the damage, conduct research to gather information about the specific type of tonneau cover seals you have.
Understanding their composition and characteristics will help you find the most suitable repair method.
Gather materials
Next, gather the necessary materials for the repair, such as adhesive, sealant, or patching kits.
Ensure that you have all the tools required, including a utility knife, sandpaper, and a clean cloth.
Preparation
Before starting the repair, clean the damaged area thoroughly to remove any dirt, debris, or remnants of the old seal. Use sandpaper to create a smooth surface for better adhesion.
Application
Follow the instructions provided with the repair materials to apply the adhesive, sealant, or patch effectively. Take your time and apply even pressure to ensure a strong bond.
Drying and testing
Allow the repaired seal to dry completely as per the instructions. Once dry, test the tonneau cover for any signs of leakage or gaps. Make necessary adjustments if needed.
Professional Assistance
When you opt for professional assistance, you can rely on the expertise and
experience of trained technicians who specialize in tonneau cover repairs. Here’s what you can expect when seeking professional help:
Evaluation
A professional technician will carefully evaluate the condition of your tonneau cover seals, identifying the specific areas that require repair or replacement.
Expertise
Professionals have the knowledge and skills to handle a wide range of tonneau cover seal repairs.
They are familiar with different seal types and can determine the most effective repair method for your specific situation.
Quality materials and tools
Professional repair services often have access to high-quality materials and specialized tools that may not be readily available to DIY enthusiasts.
This ensures a more durable and long-lasting repair.
Timely service
With professional assistance, you can benefit from a quicker turnaround time.
Experienced technicians are well-versed in the repair process and can efficiently complete the job, minimizing downtime for your vehicle.
Warranty
Many professional repair services offer warranties on their workmanship and materials used.
This provides you with added peace of mind, knowing that you’re covered if any issues arise after the repair.
FAQs
Can A Damaged Rubber Seal On A Tonneau Cover Be Repaired?
Yes, a damaged rubber seal on a tonneau cover can often be repaired rather than replaced, depending on the extent of the damage.
How Can I Fix A Small Tear Or Hole In The Rubber Seal On My Tonneau Cover?
For small tears or holes, you can use a silicone-based adhesive or sealant specifically designed for rubber materials to patch the damaged area.
What Should I Do If The Rubber Seal On My Tonneau Cover Is Loose Or Coming Off?
If the rubber seal is loose or coming off, you can try using an adhesive or glue designed for rubber to reattach it.
Make sure to clean the surfaces before applying the adhesive.
Is It Possible To Replace The Rubber Seal On A Tonneau Cover?
Yes, in cases where the rubber seal is damaged or beyond repair, it is possible to replace it.
Contact the manufacturer or a professional installer for a suitable replacement seal.
Should I Seek Professional Help To Fix The Rubber Seal On My Tonneau Cover?
If you’re unsure about how to repair or replace the rubber seal on your tonneau cover, it’s recommended to seek professional help.
They have the expertise and tools to ensure a proper fix and avoid any further damage.
Final Words
Repairing a damaged rubber seal is simple. All you need to patch small tears with a silicone-based adhesive, reattach loose seals with rubber glue or replace the damaged ones.
Regular inspection and gentle cleaning will help prevent future issues. When in doubt, trust the experts for a seamless fix.
Enjoy a secure and weather-resistant tonneau cover experience with ease.
